Quick Tips
This page contains some quick tips and tricks to make construction easier or improve technique. These are all too small for their own page, so I've collected them here since they can make life a little easier.
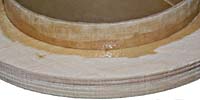
Circumference Marks on a Tube
 It's often necessary to draw a guide mark on a body tube to position a centering ring
or other construction elements. The easiest way to do this is to make a single mark
at the right position and the wrap a piece of paper around the tube at the mark.
It's often necessary to draw a guide mark on a body tube to position a centering ring
or other construction elements. The easiest way to do this is to make a single mark
at the right position and the wrap a piece of paper around the tube at the mark.
Make sure the edges of the overlap line up and the paper is tight around the tube and you'll have a line is perpendicular to the length of the tube!
Holding up Centering Rings
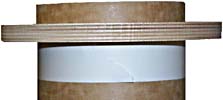 Holding centering rings in place when you bond them is a pain. Well-cut centering
rings slide onto the tube with a slight friction fit and should stay by themselves.
Sometimes the ring is too loose to stay in place when you make the fillet.
A neat trick is to mark the position of the centering ring (see above trick) and
then wrap several layers of tape at the mark. The tape holds up the centering ring
so that you don't have to worry about it slipping when you make the fillet or as
it dries!
Holding centering rings in place when you bond them is a pain. Well-cut centering
rings slide onto the tube with a slight friction fit and should stay by themselves.
Sometimes the ring is too loose to stay in place when you make the fillet.
A neat trick is to mark the position of the centering ring (see above trick) and
then wrap several layers of tape at the mark. The tape holds up the centering ring
so that you don't have to worry about it slipping when you make the fillet or as
it dries!
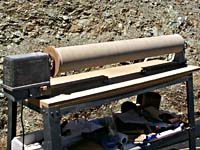
Horizontal Rocket Stand
 Those stands R/C modelers use to hold their airplanes while they work on them work
even better for rockets.
If you've ever tried to balance a tube on a table when bonding a fin, you'll appreciate
a good stand to hold the tube in horizontal position and keep it from rotating.
Those stands R/C modelers use to hold their airplanes while they work on them work
even better for rockets.
If you've ever tried to balance a tube on a table when bonding a fin, you'll appreciate
a good stand to hold the tube in horizontal position and keep it from rotating.
Shown is a Robart Super Stand which I use all the time, but most any stand works. These stands can be found at your hobby shop in the R/C department and you'll love them the first time you use one!
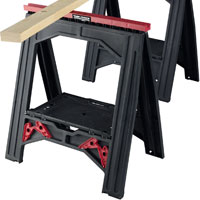
Kevin J. Small also suggests:
I for some time have also used the saw horses from Lowes/Home Depot that include "V holders"
as in attached picture.
They are not being used in the attached picture but they are attached to the saw horse itself near the bottom—they can be slid over the ends and form a nice V slot for holding rockets.
Bonding Wood
 When you bond wood with thickened epoxy, the thickened epoxy, which is good for
making a fillet, may be too thick to soak into the wood. Prepare the wood by
brushing a little unthickened epoxy onto it before thickening the epoxy and making
the fillet.
I usually mix up the batch of epoxy, paint a bit onto the wood at the joint
locations, then add the thickening and apply the fillet.
That way, you get a solid bond deep into the wood fibers and a nice strong fillet!
When you bond wood with thickened epoxy, the thickened epoxy, which is good for
making a fillet, may be too thick to soak into the wood. Prepare the wood by
brushing a little unthickened epoxy onto it before thickening the epoxy and making
the fillet.
I usually mix up the batch of epoxy, paint a bit onto the wood at the joint
locations, then add the thickening and apply the fillet.
That way, you get a solid bond deep into the wood fibers and a nice strong fillet!
Sanding a Tube on a Lathe
 Sanding a tube after laminating it is a difficult and messy job.
If you have a lathe, you can make it much easier and more accurate.
Make a custom faceplate with an oversize circle and a bulkhead for the
head and use another bulkhead with a taper bolted to it for the tailstock
and you can turn the tube between centers.
Sanding a tube after laminating it is a difficult and messy job.
If you have a lathe, you can make it much easier and more accurate.
Make a custom faceplate with an oversize circle and a bulkhead for the
head and use another bulkhead with a taper bolted to it for the tailstock
and you can turn the tube between centers.
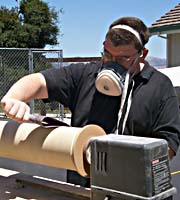
Then, all you have to do is hold some sandpaper against the tube to sand it down quickly and smoothly. Note that this generates a lot of dust, so you see I'm doing it outdoors and wearing a dust mask. (Good boy.) You probably can't make out that I'm actually sanding a tube laminated with an aramid-based cloth and a fiberglass veil.
Thanks to Pius Morozumi for this technique and the loan of the lathe!
Quick and Even Fillet Tool
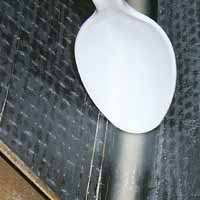
Laying out cosmetic fillets is a pain. It's hard to get an even fillet using your finger and if you use a tool, the excess epoxy tends to crawl off the tool and get on the fins and body tube.
Well, a spoon solves both these problems. The tip forms the fillet and the excess epoxy curls up into the bowl of the spoon instead of overflowing off the sides. This makes fillets neat, quick and easy.
Here you can see the spoon posing with the fillet it made, but sharp eyes will be able to see that the spoon has been wiped off and this is a stunt photo.