Rail Launch Pad Base
The launch guide of choice for medium to large rockets is a rail. These rails have been popular from their inception several years ago and have become ubiquitous for HPR since blacksky gave 100 of them away to rocket clubs. Blacksky is no more, but rails are still going strong using aluminum T-slot extrusions from 80/20 Inc.
The blacksky ProRails came in 6' sections which can be joined to make longer rails; 80/20 rails come in any length with 10' being common. A 6' length suffices for smaller rockets, but a 10' or 12' length is better for larger rockets and can handle all but the very largest projects.
 I wanted a base which would have a large footprint for stability, yet be
reasonably portable (all pieces 8' long or shorter).
This would allow the base to fit into the back of a Suburban or pickup truck.
The frame would need to fold up and be made of aluminum tubing to be light
enough for one person to lift.
I wanted a base which would have a large footprint for stability, yet be
reasonably portable (all pieces 8' long or shorter).
This would allow the base to fit into the back of a Suburban or pickup truck.
The frame would need to fold up and be made of aluminum tubing to be light
enough for one person to lift.
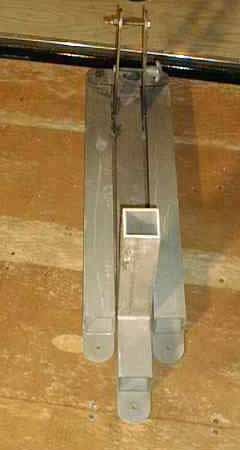
See the drawings of the base legs and mast (PDF) on the right.
Below are various pictures of the completed base and the ProRail.
Several of these bases have been made and used successfully at many AERO-PAC launches
over the last 15+ years and others have built pads using variations of the design (see below).
Thanks to Bob Fortune for the great photos.
 |
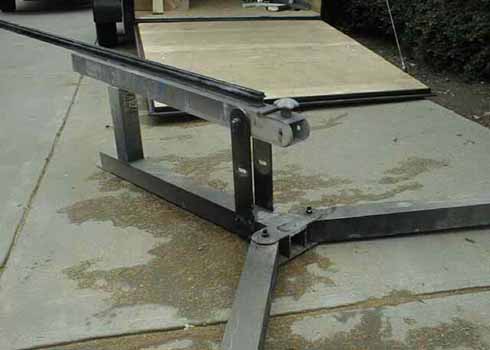
Left: The pro rail base (minus the mast) folded up for transport.
Note that the center section and the two legs stay together.
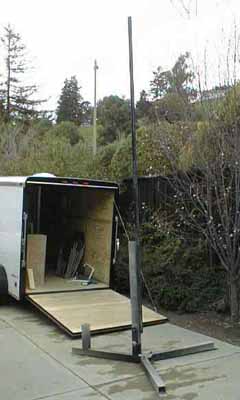
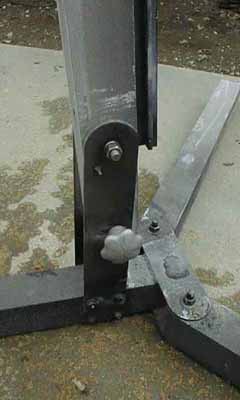
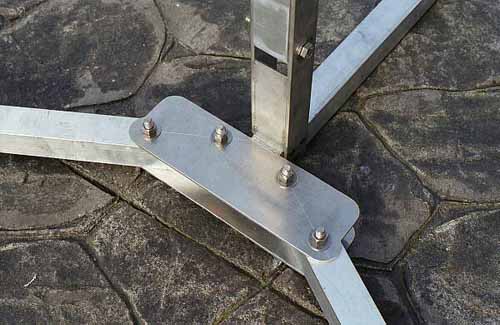
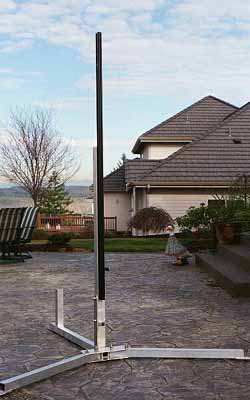
Below: The mast installed and the legs spready. Note how the mast sits on the upright in the down position for loading a rocket. Bottom left: The rail upright and ready for a launch (just missing the rocket). Note that two sections of ProRail have been installed. Bottom right: Close up of the base where the mast swings between the arms. Note that 5° of angle are available when locking the mast upright. |
 |
|
 |
 |
Kent's Additions
From Kent Newman:
Just a follow-up to our earlier conversation on building the ProRail launch
pad you detailed so well on your web site. I put together (or, rather, had
someone put together) your design based upon using 2" square aluminum tubing.
And owing to the old adage, "first author doesn't stand a chance", I made
just a couple of additions.
1) I extended the stainless steel plate at one end of the base leg to provide two points of connection for each of the folding legs. It really firmed up the stability of the stand. I toyed around with making the plate big enough to be used as a blast plate but opted for a deflector discussed below.
2) I welded a bracket on the stainless steel mast connection point to limit any tendency to rotate at that point. I'd like to play with that connection point some more but it's pretty stable as is.
3) I put a small standoff near the base of the rail to avoid dragging around a 2" X 4" or whatever to hold up the rocket. And, even at that, depending upon what's flying, I may still have to use something other than the standoff but it currently takes care of most of the rockets our group flies.
4) What I didn't get a picture of is a blast deflector that cradles the mast just below the rail, extends down at a 45 degree angle, then angles out horizontally again to provide two 1/2" holes for staking down the plate.
I suspect that most of the changes made to tighten up the launcher are due to the fact that I used 2" square tubing versus 3" but, nonetheless, it is sturdier.
Above you can see Kent's base with the two bolts for each leg. Below left, you can see the stand-off for the rail. Below right, you can see his rail assembled and upright.
 |
 |
Very nice work Kent and thanks for sharing!
Other Variations
Several other people have posted their versions of this pad on TRF: