Honeycomb Tubes
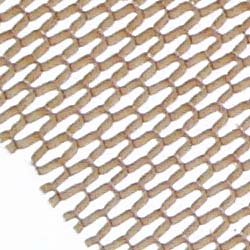
Honeycomb core is a diamond-pattern woven material which looks and behaves somewhat like the inside of corrugated cardboard. The major benefit of this material is its light weight. The honeycomb I used is 1/8" thick and when laminated with 4oz. fiberglass on the inside and out, it produces an incredibly light and strong body tube. This material can be used to make your own tubes and it can be used to increase the diameter of a standard-sized tube without adding much weight.
For example, the 4.4" long section of 3.9" flexible phenolic tubing weighed about 50g by itself. After laminating with an inner 4oz. cloth, honeycomb and an outer layer of 4oz. cloth, the resulting tube weighted only 68g. This tube could have weighed less than 18g without the phenolic standard tube inside!
One problem when making your own tubes is that you can no longer use standard components.
The honeycomb at .125" (1/8") is thicker than standard tubing walls
(phenolic tubes are generally .09-.11" (1/10") thick).
In my case, this meant that I had to use a custom nose cone, but this will often be
necessary in a scratch-build rocket anyway.
Many thanks to Gary Smokewood for information and encouragement on using honeycomb core.
Honeycomb Lamination
I needed to increase the outer diameter of my Aerobee body tubes to keep them in scale and in proportion. In order to add as little weight as possible, I decided to use honeycomb core around standard body tubes. The booster (based on a 3" I.D. flexible phenolic tube) needed to be increased to 3.7" (an increase of about ½") and the sustainer (based on a 3.9" tube) needed to be increased to 4.4" (in increase of about ¼"). Since a single wrap increases the O.D. by twice it's thickness (once on each side of the tube), this translates to a double wrap of .125" honeycomb on the booster and a single wrap on the sustainer.
To best use this technique, you need to be able to vacuum bag. You don't need a powerful vacuum; 15inHg, one half atmosphere, should be fine for this job. If you don't want to go to a commercial vacuum bagging system, try out the technique using the FoodSaver as described in my Kitchen Vacuum Bagging article. You can probably make this work without vacuum bagging, but the part will be heavier and may not be as uniform.
The honeycomb core is flexible because it has no top or bottom surface. Once you surface it with fiberglass, it makes a rigid sandwich. Note that the honeycomb core is actually only flexible in one dimension because of the way the diamond pattern is made. When you order your honeycomb core, make sure you specify that it be flexible across the shorter dimension so that you can roll it up into a tube. Honeycomb is generally sold by the square foot and you specify the dimensions and the flexible dimension. The material is generally shipped rolled up.

There are two major steps to this process: apply inner fiberglass layup and honeycomb and apply outer fiberglass layup. Note that these are done in separate baggings with a partial cure in between. You may also choose to do a third layup with a finer cloth as the veil if you use a heavier cloth for the inner and outer layups (say 6oz., honeycomb, 6oz. and 2oz. instead of 4oz., honeycomb, 4oz.). This gives you more leeway in sanding and may produce a stronger part.
In preparation, cut the body tube to final length and prepare it for laminating by sanding it with 100 grit paper until all shininess is gone. Fill the inside with couplers or motor casings covered with waxed paper or plastic wrap and tape the ends to create epoxy dams. See the vacuum bagging article referenced above for a more detailed description of the preparation and process.
For the first step, cut out your inner fiberglass cloth and honeycomb core. The fiberglass cloth should be slightly wider than the tube outer diameter as usual. The honeycomb core should be only a little wider than the tubes O.D. You want the edges to meet with a slight amount of pulling so that it sits down tight against the tube, but you don't want it to bunch up at the seam. Cut a piece of honeycomb core about ¼" (2-3 honeycomb columns) wider than the tube O.D. and 2" longer than the tube length. Test fit on the dry tube. Remove a single column of the honeycomb if that bunches up too much. The honeycomb stretches somewhat so you can adjust the fit to remove the gap.
Set the honeycomb aside temporarily and laminate the inner fiberglass layer. You will do this just like a normal fiberglass lamination. The only thing to watch out for is to remove any excess resin from the cloth. It's easy to tell when fiberglass has been wet out as it becomes transparent. Once the cloth is fully wet out, use the spreader to remove any excess resin by wiping across the fabric. The honeycomb will prevent the excess resin from being drawn off completely so you want to minimize it. Don't bag this yet; you'll apply the honeycomb first so that the honeycomb sinks into the cloth and the resin soaks up into the honeycomb to bond it fully.
Now you're ready to apply the honeycomb core. This is simply a matter of stretching it
around the inner fiberglass wrap and taping the joint to create an even seam. When done
right, the seam will be barely noticeable. (Try to avoid any gaps at the seam because the
outer fiberglass wrap will pull down into them.) Put the assembly into the bag and vacuum it.
(I didn't use any release or breather for this step.) Let partially cure (12 hours or so).
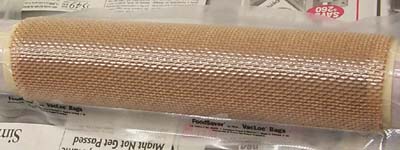
Finally apply the outer fiberglass layup. Note that the tube has changed its outer diameter substantially so you must re-measure the O.D. to determine the outer cloth size. (Don't do what I did the first time and cut both inner and outer wraps before starting. This works for regular layups because the O.D. doesn't change significantly, but not for honeycomb because each layer adds about ¼" to the diameter and much more to the circumference.) This layer is tricky because there's not much surface for the cloth to stick to (only the edge of the honeycomb diamond pattern). You will have to smooth out the cloth onto the honeycomb with one hand while holding the assembly in the other. (The fiberglass sticks better to the freezer paper than honeycomb.) Get it as tight and smooth as possible, apply release and breather, and bag. Make sure that you smooth it out well when you apply the breather.
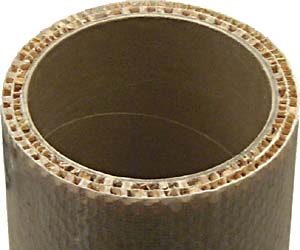
Once the outer fiberglass layer has cured fully, you can simply cut off the excess honeycomb and fiberglass from the ends with a hobby knife. Make the first cut a little longer than the tube inside since it tends to be angled and somewhat ragged. Once you have the excess material removed, carefully trim down to the end of the tube. Be careful to keep the knife blade perpendicular to the tubing so that you don't angle the ends.
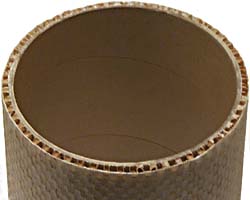
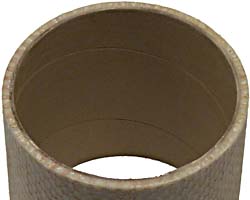
The picture on the top left shows the tube after the excess is cut off with a knife. We still need to fill the open partial honeycomb cells at the end. Thicken epoxy to peanut butter consistency with light-weight filler (I used West Systems 406 colloidal silica) and fill up the partial honeycomb cells. Let this epoxy harden and sand smooth with the end of the tube. Voila! We know have the tube on the right.
You don't have to stop there. For the booster, I added a second layer of honeycomb after the first, with a fiberglass layer in between. In this case, put the second honeycomb layer on at the same time as the second fiberglass layer:
- fiberglass & honeycomb
- partial cure
- fiberglass & honeycomb
- partial cure
- fiberglass
I purchased the honeycomb sheets, as well as other fiberglassing supplies, from Mr. Fiberglass (owner David Muesing), which is sadly no longer in business.
All-Honeycomb Tubing
The techniques above can also be used to make your own custom tubes using honeycomb core and fiberglass. The one thing necessary is a mandrel, which is the core on which the tube will be made. All other materials and techniques are as described above.
The mandrel can be any strong smooth cylinder. It must be strong so that it doesn't get deformed by vacuum bagging and it must be smooth so that you can remove the resulting tube from it. In industry, a polished steel or aluminum cylinder is used.
Custom mandrels are generally impractical for hobby use, but we do have something close: reloadable motor casings. The advantage of this is that you end up with good minimum-diameter tubes, but the disadvantage is that you are limited to only a few sizes. From a practical perspective, you're limited to 54mm, 75mm and 98mm since the honeycomb is too hard to wrap around smaller cylinders. It might also be possible to use body tubes as mandrels, although the spiral grooves would need to be filled in and the surface made very smooth.
Waxed paper makes a good barrier to epoxy and if you wrap your mandrel in two or three layers of waxed paper, you should be able to pull it out or at worst drive it out with a rubber mallet. Note that any irregularities in the mandrel surface will cause the innermost fiberglass wrap to "key" into it and you may not be able to get them apart.
Another reported source of mandrels is PVC pipe. This is readily available and comes in various sizes. I haven't used this myself, but have been told that it works. Make sure you remove all embossed markings and fill any ridges or gouges before using it. Also, make sure the piece you have is straight!
See also my Nike-Asp for more information on custom-made honeycomb core tubes.