Perfect Fin Slots
I've cut fin slots before the usual way: by marking the outline then cutting them out with a razor knife (paper) or a Dremel tool (phenolic). However, for my latest rocket, I had to make very long slots in a small diameter body tube, though flexible phenolic covered in carbon fiber, and I wanted a more precise method. I came up with a way to route the slots using a router table.
Later, I came up with a technique for larger tubes using a free-standing jig. This jig has been adapted for cutting tubes by Wedge Oldham, for slotting on a table saw by John Van Norman, and made adjustable by Kevin Small.
Using a Router Table
If you don't have a router table, don't despair. These can be cut without a fancy router table, all you need to do is mount the router under a piece of wood and clamp another board on top to act as the fence. Of course, if you do have a router, you probably should make a router table anyway, as it makes the router easier to control and safer. If you don't have a router, this technique could be adapted to a Dremel tool with a cutting wheel mounted in place of the router bit.
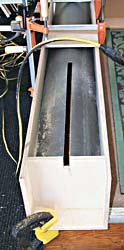
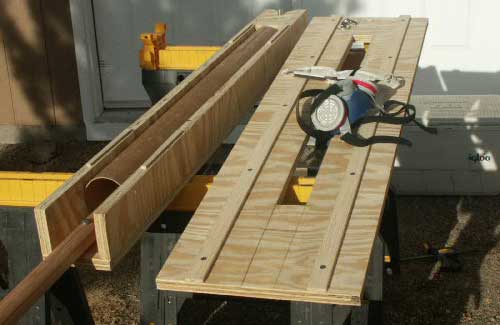
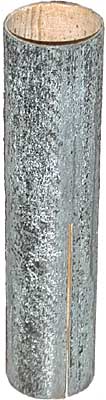 On the left you can see the body tube after the first slot has been routed.
This slot would have been very hard to cut with a razor knife or Dremel tool.
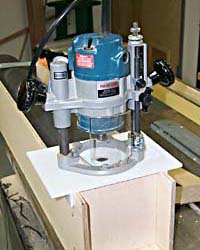
The body tube is a 54mm motor mount tube and the fins are .091" G-10.
On the left you can see the body tube after the first slot has been routed.
This slot would have been very hard to cut with a razor knife or Dremel tool.
The body tube is a 54mm motor mount tube and the fins are .091" G-10.
The slots are cut with a straight bit. The smallest diameter common straight bit is 1/8" which is too large for most G-10 material. However, Amana makes 1/16" and 3/32" bits. As it turns out, the 3/32" bit (.093") is just perfect for the common .091" G-10 material. The results are much better if you can route the slot in a single pass. Of course, you can do multiple passes with the 1/16" bit if you have thinner fins or can't find a 3/32" bit, but this will increase the possibility for mistakes.
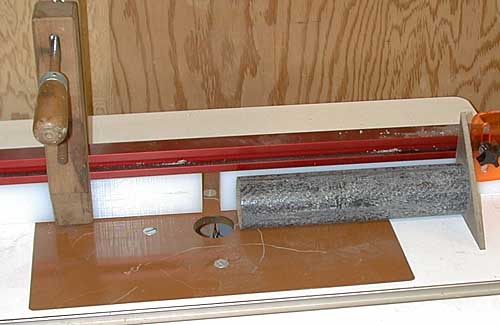
 The router table holds the router stable and the tube passes over it, riding along the
router table fence. This guarantees that the slots are parallel to the tubing.
However, you have to keep the tubing from rotating while you're making the cut.
To do this, make a right-angle to fit into the forward end of the tube,
which will prevent the body tube from rotating.
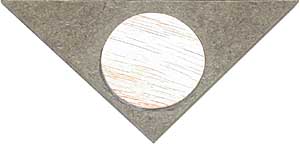
Make a tight-fitting bulkhead for the tube and epoxy it to a piece of masonite.
The bulkhead must be a tight press fit so that the tube cannot rotate or slip off while
you're routing.
The outside of the tubing should just touch two edges of the masonite.
If there is a gap between the tubing and the fence, the slot will not be perfectly
in-line with the tube.
A small gap at the bottom is OK.
The triangular guide runs along the fence and the top of the table to keep the tube from
rotating.
The router table holds the router stable and the tube passes over it, riding along the
router table fence. This guarantees that the slots are parallel to the tubing.
However, you have to keep the tubing from rotating while you're making the cut.
To do this, make a right-angle to fit into the forward end of the tube,
which will prevent the body tube from rotating.
Make a tight-fitting bulkhead for the tube and epoxy it to a piece of masonite.
The bulkhead must be a tight press fit so that the tube cannot rotate or slip off while
you're routing.
The outside of the tubing should just touch two edges of the masonite.
If there is a gap between the tubing and the fence, the slot will not be perfectly
in-line with the tube.
A small gap at the bottom is OK.
The triangular guide runs along the fence and the top of the table to keep the tube from
rotating.
To control the length of the slots, use a stop block or a wooden clamp, as I've done. Turn on the router, and slide the tubing into it slowly but smoothly until you hit your stop. Lift the workpiece up off the bit, don't pull the tubing backwards. Be careful not to push the tubing too hard or you will deform it. This sounds complex, but once you set it up, you can't help but route a perfect slot. The key is to set everything up in advance so that once you turn the router on, the workpiece can only move the way you set it up. Control of the workpiece is the main challenge when using a router.
My slots went all the way to the end, but of course you can drop the tube onto the bit instead of sliding it on from the end if you want to make stopped fin slots. To make the stopped slot, use a block behind the guide to set the distance from the aft end to the start of the slot. Set the guide against the back slot, lower the tube onto the turning bit, and make your cut as usual.
Jim Jannuzzo used this technique and made following excellent suggestions:
I used this method this weekend to slot two fin cans of G12 fiberglass tubes. It works very well: I kept alignment and spacing tolerances down to a few thousandths. Here are a couple of suggestions:
Bore a hole in the wooden endplate, and duct tape a vacuum cleaner hose in it. Close off the open tube end with almost anything that doesn't overlap the outside of the tube. Especially when you're slotting carbon fiber, or pre-glassed tubes, the fibers in the dust are nasty and unhealthful. By sucking the air from the interior with a vacuum cleaner, you reduce the dust and fumes tremendously.
I recommend using a two-flute, carbide router bit if you're routing hard tubes, like carbon or 'glassed tubes. These are available from Freud at most big hardware stores for about $12. I learned the hard way, and ruined a tube with a cheap, $3 single flute bit- the bit dulled and drifted during the cut, and I couldn't control it.
I also drilled four locating holes (the same diameter as the router bit) where I wanted the slots to be. That way, you just fit the holes over the bit, snug the tube to the fence, clamp against rotation, and slot yourself silly.
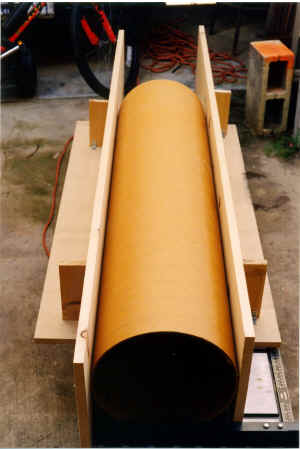
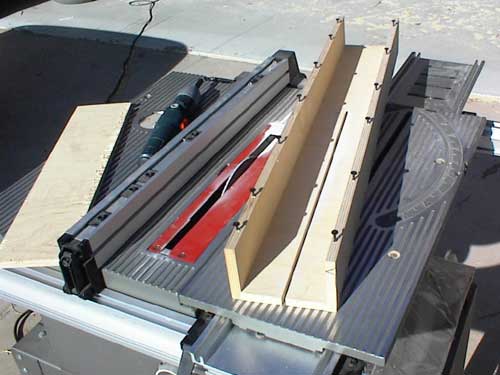
Using a Jig for Larger Tubes
The technique above worked great for the 54mm tubes shown above. However, when it came time to slot the tubes for my 6" level-3 rocket (see my generic rocket), I realized it wouldn't work well. First of all, most router table fences aren't tall enough (which might be solved with an auxiliary fence). Secondly, the table typically isn't long enough to support the length of cut and it's not easy to build the stop so far off the end of the table.

I was determined that the fin slots be perfect, so I wanted the router to be fully guided during the cuts and stopped at the ends. Since the router table wouldn't work, I needed to make a jig (it's the woodworker in me). The jig is re-usable for different length and width of slots, although it is made for a single body tube diameter.
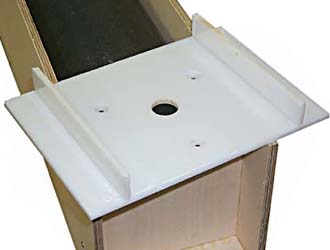
The jig shown on the right is basically just a four-sided box with the top and one end left off. This allows the tube to sit snugly in the box with one end of the tube butted firmly against the end of the box. The walls of the jig should be about 1/4" taller than the O.D. of the tube. In use, the jig is clamped to a table and the tube is clamped inside the box. (I built my jig out of 3/8" birch plywood since I had some lying around.)
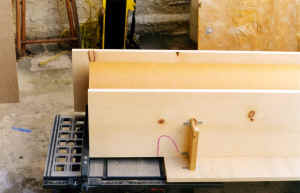
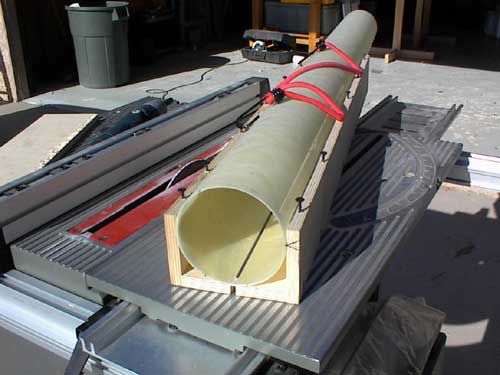
So now, we have the box which holds the tube firmly, but we need a way to guide the router bit down the center of the tube. To do this, I built a carriage for a small plunge router out of some Lexan® I had left over from another project. (Lexan is great stuff as it can be cut with woodworking tools and bonds quickly and strongly with the matching adhesive.) The details of this part are dependent on your router and the style of your box. (I made mine so that the two rails rode on the outside edges of the box.)
 |
 |
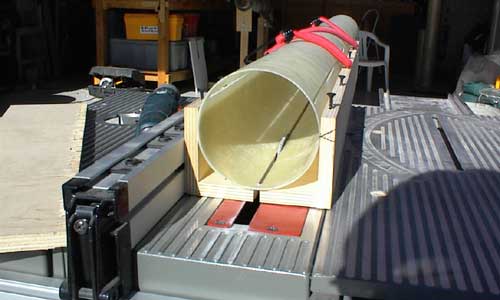
In the photo above right, you can see the router mounted on the carriage and the carriage placed on the box. To use the jig, just clamp the tube and box, install a bit in the router, and route away! To stop the slots a uniform distance from the end, I also made a stop which you can see on the in-use picture below left. Note also how everything is clamped together so the the tube cannot move. I also put a strip of duct tape inside the box where the sides of the tubes contact it so the tube can't twist.
 |
 |
The first slot can be cut anywhere around the tube. This will give you a start for marking out the other tubes and the jig itself will give you a guide for lining up the next slots because the end of the box will have the slot cut into it. Below are some other tips I picked up while developing this technique:
- Duct tape inside the box where the tube contacts it prevents the tube from rotating.
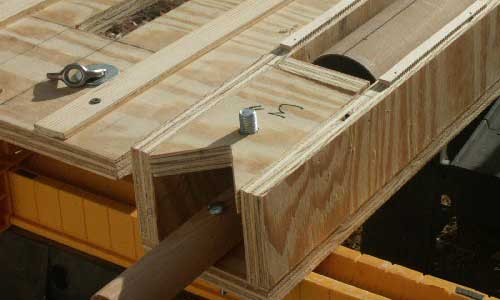
- The stop block also helps keep the top edges of the box parallel so the carriage works properly.
- The end wall is recessed so you can start the router outside the box with good support for the carriage
- Make sure everything is securely clamped down before you start the router.
- Don't over-tighten the clamps otherwise you will distort the tube and perhaps break the box.
- Start the router with the bit clear of any material (past the end wall).
- Move the router slowly and steadily through the cut for clean edges.
- Router bits are made in many thicknesses; I found Amana straight bits in 1/32" increments!
Aside from the fact that you have to make the jig, this technique is easier to use than the original router table technique (at top) and is easier to control. It's also much safer. Happy slotting!
Wedge Oldham used this technique and had some excellent tips to share:
Maybe it was just my setup, or that the box wasn't as tight as it needed to be. But when I pushed the router to make the cut, then released pressure on the router it wandered slight toward the center of the box. This left kind of an "L" shaped cut at the end. Nothing some extra epoxy won't cure.
And most importantly, after you have pushed the router to the end of the cut, do not try and pull the router back along the same cut. Big mistake.
Using the Jig to Cut
Wedge Oldham found another use for the fin slot jig: cutting tubes to length! As Wedge says:
Cutting tubes has always been a problem for me. I haven't been able to find a way to cut them straight. Until now.
After I had built a "Coker Jig" to cut the fin slots, I laid the jig on top of my table saw. I found that this would not only keep the tube perpendicular to the saw blade, but the tube could be easily rotated while cutting.
Below is more of a side view of the jig on the table saw. It's important to note that the side are longer than the base. This is what allows the saw blade to extend upward and do the cut. For this particular cut (7" off the end) I was able to use the normal saw fence as a guide for the cut length.
Be sure to visit Wedge's own site.
Table Saw Slotting
John Van Norman has a nice technique which works on a table saw. Here's John's report:
I finally did something today I've always wanted to be able to do. I figured a way to accurately cut long fin slots in G-12 tubing on a table saw. It involves a slight modification to John Coker's router box technique. I built a three sided box out of plywood that just fits the tubing. I then cut a 3/16 slot straight down the middle that ends about 18" from the forward end of the box.
The tube is then marked on the end in thirds (or you could use any number of fins). A mark is made on the front of the box where the sides meet the tubing. The tube is then laid in the box aligning one of the marks on the tube with the mark on the front of the box. I used a bungee cord, crisscrossed back and forth across the top to hold the tube in place and to keep it from spinning, not too tight, so the tube shape doesn't get distorted.
I used a metal cut off wheel. Lay to jig down against the fence and slowly crank up the blade until it pokes through the tube. You could just start it from the end if your slots are all the way to the end, but I wanted to see if I could put them a half inch from the end, which was no problem. Then just slide the whole thing along like a piece of lumber until the blade hits the end of the slot in the jig. You know this happens because metal cut off wheels don't cut through wood very well. Turn off the saw and lift the whole thing off. Spin the tube to line up the next mark and repeat.
Turned out perfect! I tested it on a piece of phenolic and it worked great on that, too! So for those of you with a table saw but no routing table--there is hope!
Shot one: Shows the over all box design (look familiar?) The "V" mark on the end of the box is the alignment mark. The relief slot is also seen. Note the sides don't go over the height of the tube. The reason behind the screws sticking out the top becomes apparent in shot 2. Also note: metal cut-off wheel installed on saw.
Shot two: Shows the tube in the jig, with the bungee cord holding it in place. The trick not to over tighten the bungee so as to bend the jig or distort the tube--just enough to hold it firmly. Though perhaps hard to see, you can make out the markings on the end of the tube--this was done using the "old stand the tube on the template" method. Simple but effective. With the tube in the jig you simply line up the mark on the tube with the mark on box.
Shot three: As I said when I did this tube I wanted to see how hard it would be to put the slot 1/2" from the end of the tube. I did this by lowering the blade, setting the jig on the saw and cranking the blade up until it comes through the tube. Then carefully go backwards just a hair until the slot is where you want it, (for slots that go all the way to the end just start with the blade up and go for it), then forward until the wheel hits the end on the relief slot--turn off the saw and lift the jig off.
Mike Dutch added this tip for cutting larger tubes: When you are cutting a large tube, (5" or larger), and doing a long cut (24" or more), you will want to add a brace of wood across the front end of the jig such as a two inch block set up an inch or so from the slot so as not to cut it.
This will give you a quick and positive stop for the tube and it will keep you from binding the saw blade in the jig if you put too much tension on the tube with the bungee cord. It will also help make the jig last longer since you won't be cutting the slot wider if you did put too much tension on the tube with the bungee cord (especially after the first couple of cuts when the tube will want to collapse too).
Adjustable Slot Jig
Kevin J. Small built the slotting jig differently so that it becomes easily adjustable. Here's his report.
Was just looking at your web pages again, and figured I'd send you pictures of the tube slotter I made based on one of your examples. Primary difference (it appears) is that your one example requires a new tube holder and new router guide be built for each tube size. The attached uses the same router guide for different size tube holders (so I only have to build a tube holder per tube size).
The bolt on the tube holder is used to fasten the one end of the router guide in place. The router guide hole is somewhat oblong so there is some adjustment side to side. I hold the other end in place with clamps. You can also see a rod sticking out the back (next pict explains that more).
You can see a stair handrail going through the length of the tube. It is bolted at the back end, and again at this end. I actually picked a warped rail so that when i tightened the bolts at either end, it tends to clamp down on the tube from the 'center out', if that makes sense.