Tip-to-Tip Jig
High performance rockets put a huge amount of stress on the fins. Large heavy rockets put large amounts of torque on the fins and high speed rockets can cause the dreaded fin flutter. All large rockets subject fins to high forces on landing.
Reinforcing wooden fins with fiberglass or other composite reinforcement helps to make them stronger. (G-10 fins generally don't need reinforcement for strength.) However, for very high speed rockets, you also need to stiffen fins and carbon fiber makes an excellent reinforcement for this purpose.
Fins can be covered with appropriate reinforcement before being mounted to the body. This will make the fins stronger and stiffer. For conventional rockets with motor mount tubes smaller than the body tube, the fins are bonded at three points: outside the MMT, inside the BT and outside the BT. However, for minimum diameter rockets, the fins are bonded only at one point: outside the BT.
For minimum diameter rockets, it is desirable to reinforce the fin/BT joint for strength. In addition, because minimum diameter rockets are often high performance, it is desirable to stiffen the fins as well. The best way to do this is to laminate the fins tip-to-tip with carbon fiber and fiberglass. By laminating the fins tip-to-tip (and over the body tube in between), we reinforce the joint, stiffen the fin and make a solid fin can.
Building The Jig
The "tip-to-tip jig" described on this page is fixture for holding the rocket in place so that the fins remain properly lined up while the reinforcement is vacuum bagged in place. (The jig can also be used without vacuum bagging, for example by using water or bags of lead shot to apply pressure.) The primary job of the jig is to hold the body tube and two fins in alignment so that the reinforcement could be applied. I also wanted the jig to store in a reasonable amount of space and accommodate three and four finned rockets.
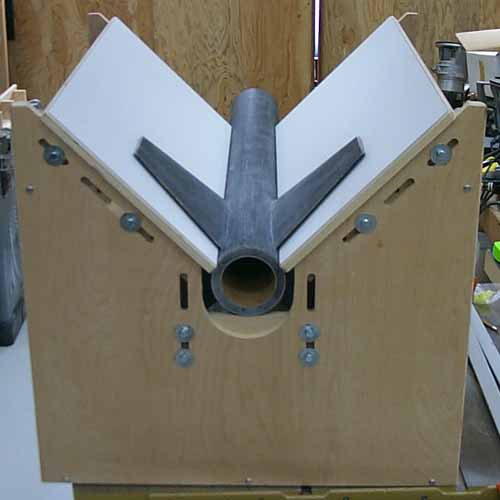
In the photo above, you can see the completed jig assembled with a rocket in position. Note:
- two flat tops which slide along the sloped edges of the ends for different diameter rockets,
- cross brace while holds the bottom of the tubing at the correct height for the body tube diameter and for the fin thickness,
- slots which allow adjustment of the tops and the cross brace,
- and screws around the edges of the ends which allow the jig to be disassembled for storage.
Actually, this rocket is not minimum diameter, but is the baby booster for my Nike-Asp. However, the jig is useful in reinforcing all flat fins. The jig was designed for rockets up to 6" body tubes and could handle larger tubes by making the U-shaped center hole larger.
The most critical parts to making this jig accurate are making the tops flat and stiff and making the angled edges of the ends at perfect right angles and identical. The tops were made from ¾" birch plywood and reinforced with solid birch strips glued and screwed to the bottom. The tops were then covered with plastic laminate (Formica® in this case) to make a hard smooth surface. In the photo below, you can see the two tops assembled just before they are covered with laminate.
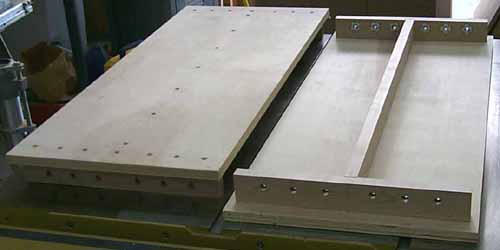
Note the solid wood ribs to keep the top from bowing down. Also note the large T-nuts in the end ribs which accept bolts through the slots in the ends for adjustment. It is important to choose plywood that is as flat as possible for the tops. Also, make sure the solid wood for the ribs is dry and straight. If you live in a humid climate, it's probably better to use plywood for the ribs, perhaps doubling it for extra strength.
To keep the sides uniform, I cut them to size and clamped them together before cutting any of the details. The angle was cut using a circular saw (Skill saw) and then sanded to a perfect right angle. The U-shaped center was cut out with a jig saw (this is not a critical edge). The slots were cut with a router using a ½" straight bit.
The bottom is another piece of ¾" plywood with small rabbets along two edges for the ¼" plywood sides. The end pieces also have ¼" rabbets to accommodate the sides. The cross braces are also ¾" plywood with T-nuts to allow vertical adjustment. The picture below shows how the body of the jig goes together.
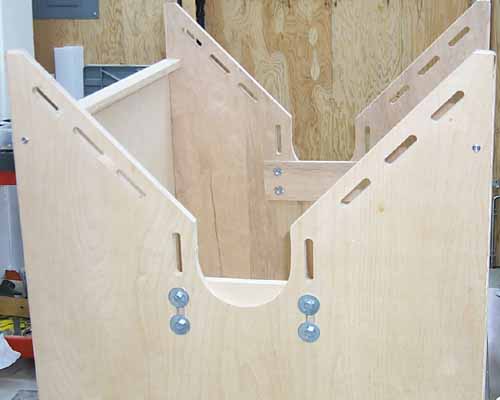
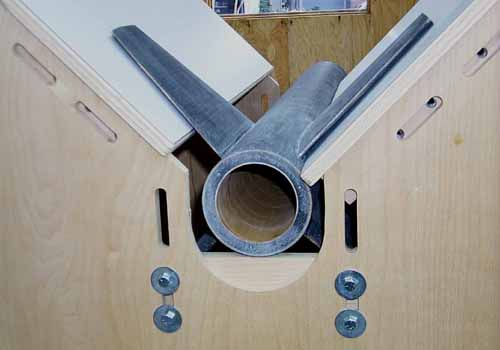
In the picture below, you can see how the tops slide apart and the rocket is placed into the center. The tops then slide down onto the body tube, providing complete support for the fins. If everything is built square, the rocket will automatically line up properly and both tops will butt against the rocket along their entire length. The height of the cross braces can be adjusted so the fins are supported from the root to the tip.
These pictures show the four fin jig. To make the three fin jig, new end pieces are constructed, but the rest of the parts are used with either set of ends. Note that I made a second set of ends for 3-fin rockets and also used the jig successfully on my Big Arreaux.
Using The Jig
All the jig really does is hold two of the fins at a time in alignment, but that is critical to getting a good fin can. Not only do the fins need to be straight, evenly spaced and perpendicular to the tube, but they need to be held in that position under force. Originally, I was going to put the entire jig into a vacuum bag, but after that turned out to be too much, I weighted the reinforcement down with 60 lbs of mortar.
The first thing to do is cover the two tops so that epoxy doesn't stick to them. In the pictures below, you can see the non-porous Teflon® release film I used. Anything that epoxy won't stick to will work, such as waxed paper.
Lay the rocket into the jig and adjust it so that the tops support the fins from the body tube out and the fins lay flat against the tops. You can raise and lower the rocket in the jig using the adjustable end ribs and move the two tables separately. Once the rocket is even and the fins are properly supported, tighten everything down.
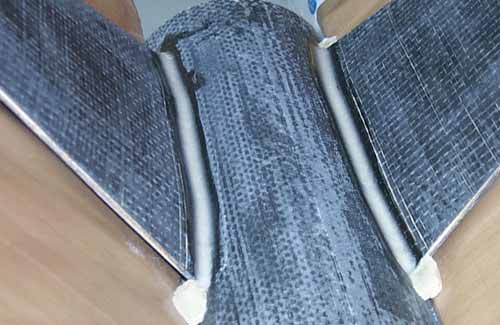
If you have thick fins like I did for the baby Nike booster shown, you will need to block forward and aft of the fins along the root to prevent epoxy from running down behind the fins. I used some modeling clay to make small dams to prevent the epoxy from running out and to provide a transition for the fillets as you can see on the right.
The first thing to do is to make a healthy cosmetic fillet along the root edges of the two fins. This helps to bond the fin more strongly, but it also provides a nice radius for the cloth. (The tighter a corner you try to make the cloth turn, the harder it will be to get it to lay in there.) In the picture below, you can see the fillets I built up for the Nike fins. The fins have a span of 9" and the fillets are about ½" wide.
Once the fillets reach partial cure (firm but slightly tacky), it's time to lay on the reinforcement. Use whatever technique works best for you. I decided to apply a liberal coat of epoxy to the fins and the body tube between them and then apply the cloth dry. This makes it easier to position the cloth (without it being wet and saggy). First I applied a layer of carbon fiber, then a layer of fiberglass.
Take time to make sure both layers (one at a time) are fully touching the fin and body tube, especially at the fillets. If the cloth is not touching, you will sand through it later and lose the strength you were trying to gain!
Make sure there is plenty of epoxy to wet out the cloth, even a little past the edges of the fins. If there are any dry spots, brush on more epoxy until the fiberglass goes fully transparent. Finally, dab off excess epoxy with toilet paper.
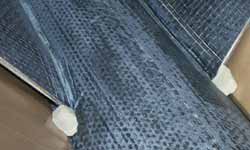
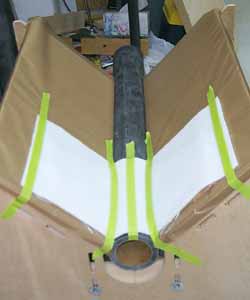
Once you're happy with the cloth, make sure one final time that it touches the fin and body tube everywhere. Double-check the fin valleys for even contact with the fillets. Now, apply the release and breather. I set everything up as though I was going to vacuum bag, but didn't actually use a vacuum bag. Note the tape in the picture on the right to hold everything in place so it doesn't shift.
Because I didn't have a vacuum bagging setup large enough to accommodate the entire jig, I tried to vacuum just the top part of the jig. I couldn't get a good seal around the rocket so I gave up on vacuum bagging all together. Instead, I just weighted the whole mess with mortar.
A visit to the local hardware store and I picked up a 60 lb. sack of mortar mix. This seemed to the densest stuff and had a very fine consistency. I put the mortar into a home-made bag of 20 mil vinyl vacuum bagging sleeve with the ends sealed. This seemed to work well enough, although it was tricky to move the bag without tearing it.
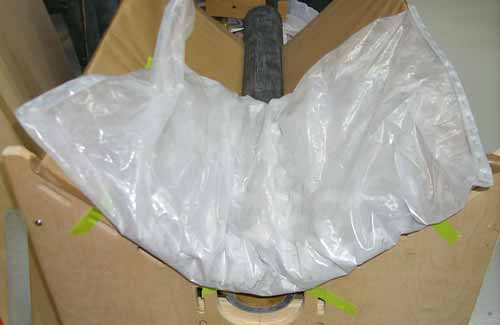
Lay the bag in from the center out and try to get the bag to follow the contours of the body tube and fins, including down into the fin valleys. The mortar can be moved around inside the bag by hand to spread it evenly over the whole fin. I also tried using a vibrator to settle it, but I don't think this did much. Once the mortar seems to be doing it's job, let the epoxy partially cure (to the "leather" stage).
Remove the rocket from the jig once the epoxy has partially cured, but before it has fully cured. If you catch it at the "leather" stage, you can easily trim off the excess with a sharp hobby knife and save yourself lots of nasty sanding later. Also, if you need more epoxy, you can apply it without loss of strength.
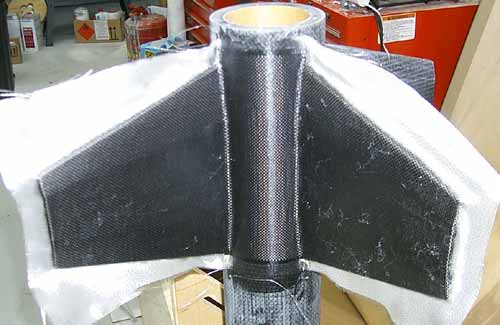
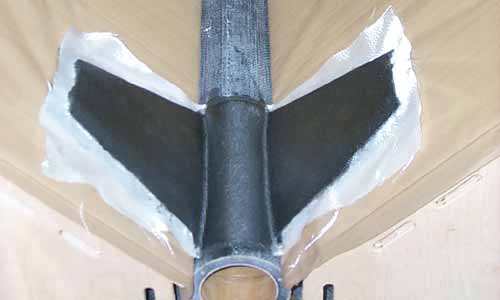
Above you can see the rocket after removal from the jig. Note the curly white fibers stuck to the carbon, indicating that we did have an effective transfer of excess epoxy through the release to the breather. Truly a thing of beauty!
Trim off the excess and set the rocket aside to fully cure. Then, it's time to go on to the rest of the fins. I think you will be very pleased with how well the fin can comes out and there's nothing to beat the stiffness and strength of fins laminated tip-to-tip with carbon fiber and fiberglass.