Defender MKIII
In early 2014, BadAzz Rocketry had a sale, and I decided to give one of their kits a try. I hadn't built any speed/altitude screamers in a while, so I chose the Defender MKIII 54mm diameter with 38mm MMT, plus the avionics bay option. (Also, I liked the look of the fins and the nose cone.)
The Pictures
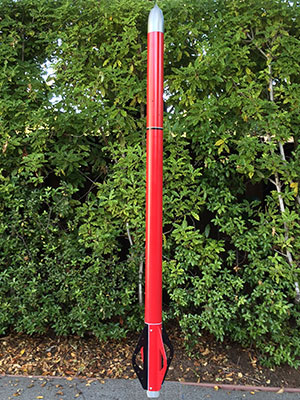
The obligatory "I just painted it, quick let me get a picture before it gets dinged up" shot:
Aeronaut 2014
For the first flight at Aeronaut 2014 (August 1st), I decided to fly it on an Aerotech J510R. This uses the extra-long 38/1320 (six grain) case, which was a first for me.
I built the motor at home, so flying it was quick and easy. Once the TeleGPS obtained GPS lock (cold boot), I assembled the rocket and headed out to the pad.
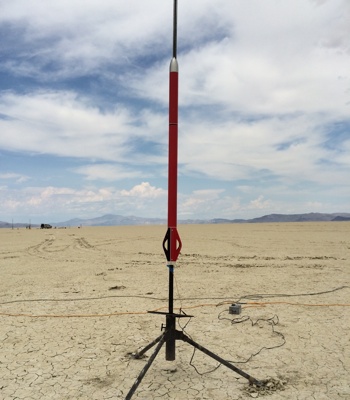
The rocket zoomed out of sight since it was nearly all motor! The flight was perfect and the rocket was recovered with no damage only 2000' away from the flight line.

I flew two Missile Works units in this rocket (see below). Both units worked perfectly and fired both drogue and main charges. The RRC-2+ beeped out 9830 feet and the downloaded data from the RRC-3 showed 9832 feet.
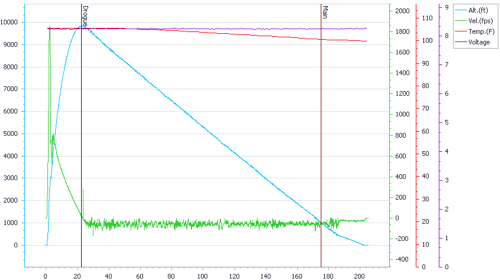
| Max Altitude | 9832ft | Power Up Temp | 102.2°F | Pad Time | 16.22m | Descent Time | 182.5s |
|---|---|---|---|---|---|---|---|
| Max Velocity | 1857fps | Launch Temp | 105.4°F | Power Up Volts | 8.27 | Drogue Rate | 56fps |
| Ascent Time | 22.5s | Low Temp | 99.9°F | Launch Volts | 8.25 | Main Rate | 38fps |
All in all, I was very pleased with these units. They are baro-only, but still performed perfectly, even at Mach 1.6. The RRC3 reports a lot of data in a nice format (see above).
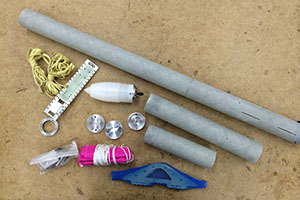
The Kit
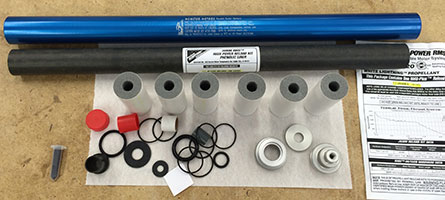
The kit arrived in good shape. The finish of the parts was quite impressive, with the fiberglass parts precisely cut, drilled and slotted.
 |
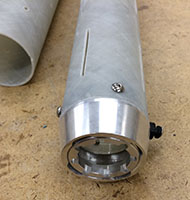 |
Above is an overall view of the parts as you open the package. On the right is a close-up of the aft end, showing the custom motor retainer.
 |
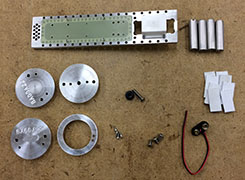 |
Above are close-ups of the fins and the avionics bay parts. At first I was worried about the sled being heavy, since it is thick chunk of aluminum, but most of the center is hollowed out and there are extra holes drilled to reduce mass.
An interesting feature of this kit is that it can be built for 54mm (minimum diameter) or 38mm motors. I decided to build it for 38mm, using the custom motor retainer and aluminum forward centering rings. The fins are through-the-wall, with tabs that protrude into the inside. So, even without an actual motor mount tube, inside fillets can be applied to the fin tabs. (If you wanted to make this minimum diameter, you would have the cut off the extra length of the tabs.)
The Build
The kit was very well thought out and nearly complete. The only real thing for the builder to do is to bond the fins and set up the electronics bay for his preferred flight computer. Note that no instructions came with the kit, so it's especially important to figure out what everything is for before starting.
Fins
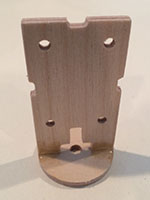
The fins fit tightly in the slots, in fact I had a file some of the slots slightly to allow the fins to slide in. However, I still thought it was worth making a fin guide to ensure the four stick straight out from the body. Note that this rocket has four fins.
 |
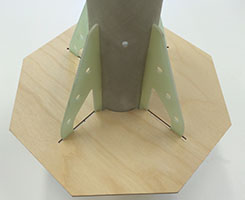 |
Above you can see the guide I cut from 1/8" plywood. Note the octagonal shape, I've learned that making the guide outer shape be a polygon with a number of sides equal to twice the number of fins means that You can use it to hold the airframe nicely either with a fin up or two fins at 45° (120°) angles.
As usual, I tacked all fins in place with CyA first, then bonded them with epoxy. This time however, I did the inside fillets first. The octagonal guide allowed me to get both sides of one fin at a time for the internal fillets and also one side of two fins at a time for the external fillets.
Electronics Bay
I purchased the electronics bay option, which comes with an aluminum sled and end caps. The airframe and bay coupler have all holes pre-drilled, so again it's just a matter of figuring out how things are supposed to work.
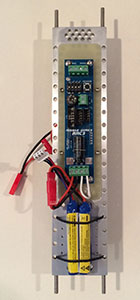
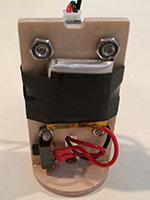
Things are always tight in a 54mm airframe, and I wanted to use redundant altimeters, so that was even more true in this case. But, I managed to squeeze two Missile Works units in: one RRC3 and an RRC2+.
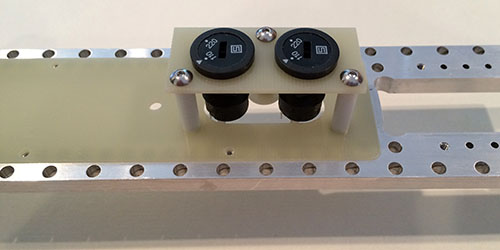
Above you can see how I made a daughter plate to which I mounted the switches. This is raised from the surface on one side using Nylon spaces cut to just the right length. I cut custom 1/16" G-10 plates with holes laid out exactly for the two Missile Works units.
 |
 |
There is a custom space for a single 9v battery, which is nice but doesn't really support two devices. I managed to fit two LiPo batteries into the same space to power both units by wedging them in next to either other. It would probably have been a better design to lengthen the area of the plate and allow the builder more options in laying out the electronics and batteries.
Nose Bay
There was space available inside the UHMW nose, and a nicely fit fiberglass plate, so I felt that I had to take advantage of it. Altus Metrum had just released their TeleGPS (tracker only), which is tiny and fit easily into this small space.
 |
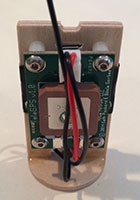 |
 |
A tiny sled, only 1.2" wide, holds the unit and its battery on opposite sides. No external switch, so I just have to plug in the battery before taking the rocket out to the pad.
Finishing
One nice thing about fiberglass, is it's easy to finish; the surface is pretty much ready for primer as-is. This allowed me to do quick one-prime cycle and paint it with rattle cans.
Since this is a fantasy rocket, there were no limits on the paint scheme. I decided to go with a variety of colors, with a metallic nose (since it looks like a ram jet). The body is mostly red with sections of black and white stripes.
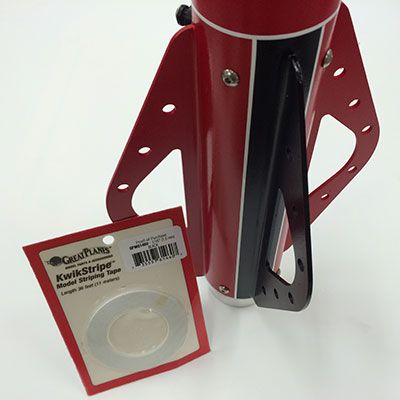
The white stripes were a new thing for me. It's hard to paint thin stripes accurately, so I decided to use striping tape. Above you can see aft end with the black fins outlined in white and the Great Planes KwikStripe tape I used.